Tuesday, June 19, 2012

Patriotic Picnic and Layout

I must admit I find it hard to limit myself when it comes to all the patriotic papers and embellishments put out every year by paper companies.  I just love the July 4th celebrations with all the picnics, grilling out, hanging out with family and friends, burgers and brats and hotdogs, and of course the fireworks!  It's awesome to be an American!  Right now at Scrapdoodles you can find several awesome lines of patriotic papers and embellishments.  It was hard to choose, but I took home several sheets of double sided papers and some of the layered chipboard elements from We R Memory Keepers "Red, White & Blue" line as well as a few sheets (I couldn't resist the kraft) of papers from Pebbles' "Let Freedom Ring" line.  To complement these papers, I also chose a sheet of tiny letters and phrases made by Authentique ("Glory").  What did I make with all these goodies?  LOTS!  Take a look!

First - a layout with little "Super Hannah" celebrating the hero in her life - her daddy.  I love these papers for a Father's Day layout!   I cut out some of the paper elements to create the two tags at the bottom and part of the title.  The tag and star circles are some of the coordinating layered chipboard.

Next I decided on a few projects to decorate our July 4th picnic table.  These projects were pretty easy to put together and really make your table stand out from the crowd.  I framed the Pledge of Allegiance 12x12 print (by Pebbles) (after adding just a bit of red stickles and a few confetti stars), then added the embellishments to the outside of the frame.  The firecracker element is simply a rolled bit of paper with shiny streamers (left over from some other project) glued into the roll.  For the embellishment in the upper left corner, I started with a 12 inch strip of paper that included the bar strip area to get the striped edge.  It's then just an accordion fold, spread open like a fan and glued onto a half circle on the back.  The tag is a layered chipboard embellishment and the "Let Freedom Ring" flag is, again, part of the barcode of the Pebbles paper wrapped around a toothpick and notched.  Speaking of flags, you can buy them already made by We R Memory Keepers, or go ahead and make your own, like I did, with paper scraps.  I also added some stitching and a few extras to this set of flags.  They are fun to make and a little addicting. You can use them on cupcakes or other desserts or anywhere that needs an extra little "hooray!"


But, wait! There's more!  I made a patriotic centerpiece with the papers by making accordion fold stars and medallions and adding various embellishments.  I added little flags with some of the words from the Authentique sticker sheet.  The "Honor" embellishment is one of the large layered chipboard elements from We R Memory Keepers.  I like how it stands out in my "bouquet."  The tin bucket is something I had bought at the Target dollar spot a few years ago.  I rounded off the centerpiece with some ribbons and paper strips curled around a skewer.  Everything is taped or hot-glued to wooden skewers and stuck into a piece of foam in the bucket.

Last, but certainly not least, I decided to dress up some plain condiment containers with more paper strips, a few tags (cut from the paper sheets) and ribbon.  I love how everything turned out and can't wait to celebrate our country in just a couple weeks.  Happy Birthday, America!
 

Saturday, June 16, 2012

Father's Day

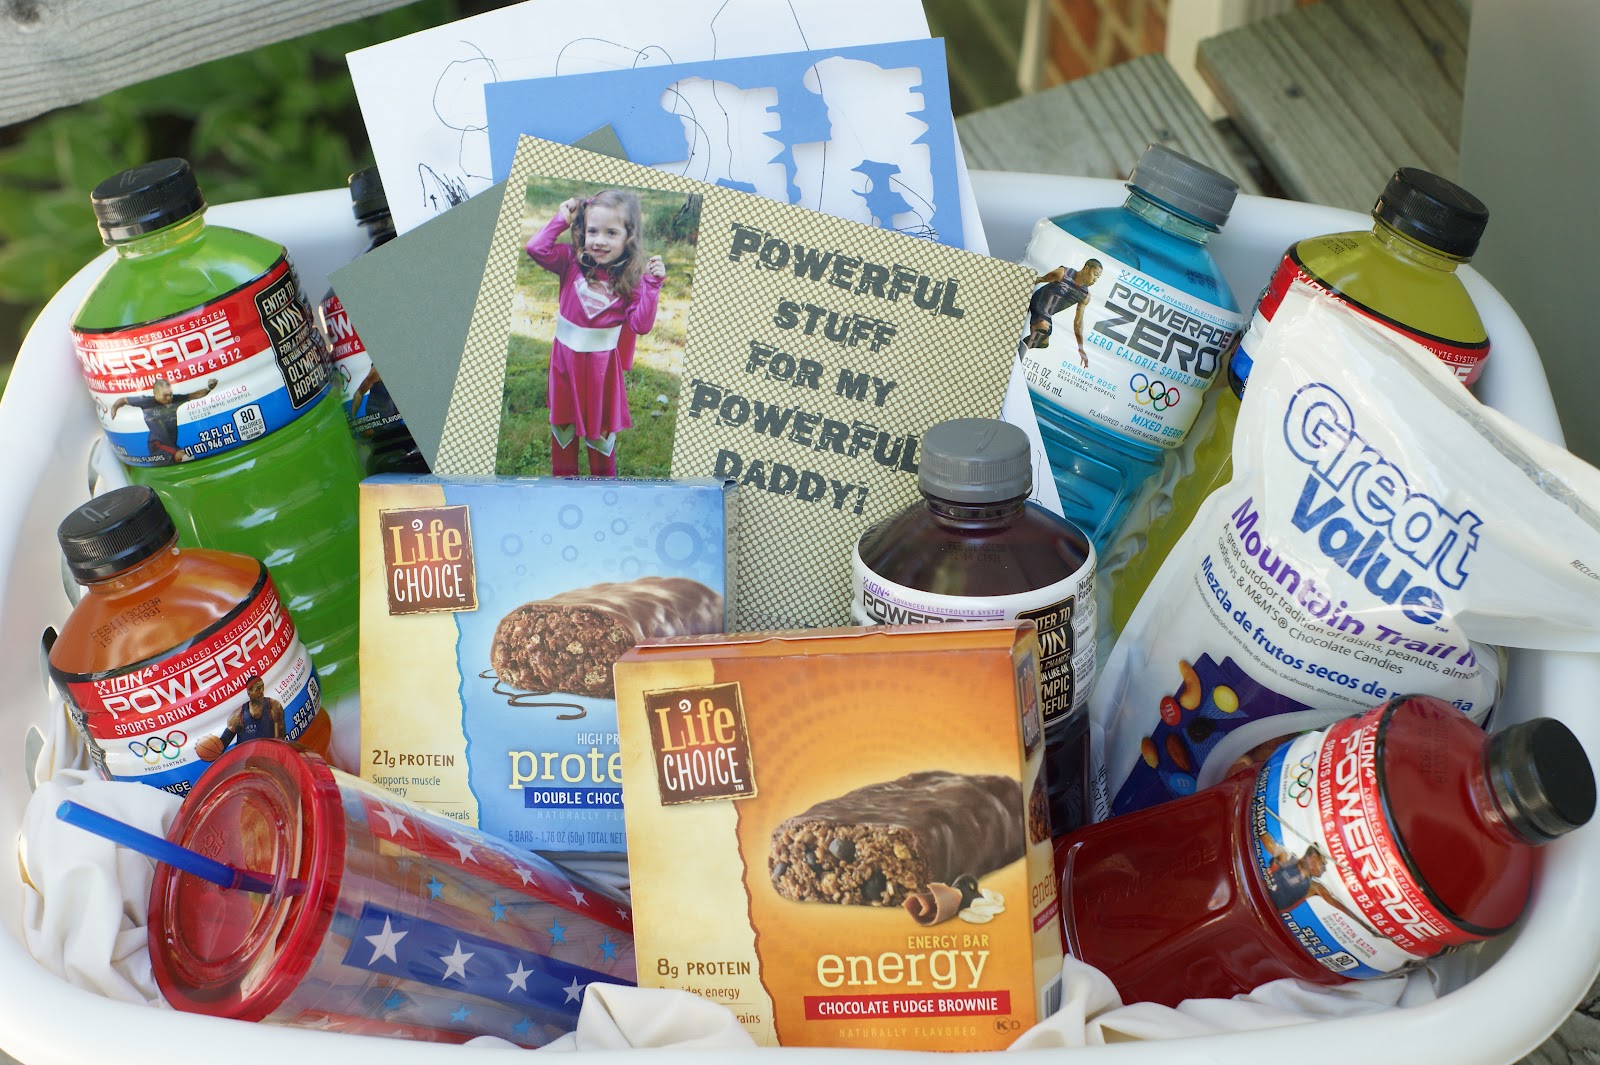
Happy Father's Day to all the awesome dads out there!  While I know my own awesome dad is in heaven, we sure miss him down here.  Luckily, there's another awesome dad in the house - my husband!  I'm so grateful for him, for all he does for us, and for the way he loves our daughter to pieces :).  Hannah and I had a fun time making a few special "powerful" presents for him this year.  She put on her supergirl costume and we had a crazy fun photo shoot in the back yard.  The pics are so cute!  I cut out letters with the Cricut for her to hold to get these shots and printed them out to fit in this 5x7 frame.
I used some of the other photos to create a gift tag with a "powerful" theme.  The sentiments are just printed from my computer.  We paired it with a basket full of power drinks and power snacks.

Next we made a "super" card for our  super daddy.  This time I printed the sentiments right on the photo.  I hope he gets a kick out of these gifts!  I can't get over how fun and easy it was to put these items together.

Of course, even though my own dad is gone, we do still have special men in our lives - my husband's dad, his dear uncle, and friends who are second "dads" to our girl.  So I made a few cards like this one to let them know how much we appreciate them, too.  Happy Father's Day!

Tuesday, May 22, 2012

DIY Baby Shower Ideas and Tutorials

I'm very excited to offer another class through My Creative Classroom this summer!  I've put together many of my favorite ideas and tutorials for the cutest diy baby shower ever.  This 4 week class is full of adorable ideas, whether you're planning a shower for a boy or girl.  We'll make invites, thank you note set, diaper cakes, banner, favors, decor, and more!  My theme for my sample projects is owls, but every project is easily adaptable to your shower colors and theme.  Join me for this fun and project-filled class and prepare a great shower for that next baby in your life!


The classroom is now open for registration (click on the photo above or Here).  Class start date is June 25th.  Remember this class is completely online and can be finished at your own pace.  During the class, help is available through interactive forums and project galleries.  I hope to see you in class this summer!

Tuesday, May 15, 2012

Summer and Echo Park Layouts

Love to go into Scrapdoodles and see what catches my eye.  I knew I had some summer layouts to do, and Echo Park "Happy Days" collection caught my eye.  I created these two layouts using papers and a few layered chipboard embellishments from this collection.  For my first layout, I started with plain white cardstock.  I cropped a four horizontal photos and backed them with black cardstock, then a strip of patterned paper.  I added the three strips on the right and a few embellishments.  I cut my title with my Cricut (cousins is from "Heritage" and friends is from "Create a Critter").  I thought it needed a little more so I punched out several circles and popped them up with a foam dot.  I love the white on white dimension paired with the bright colors.

I journaled on my computer and then printed it out on cardstock to add to the page.  I normally just write, but I wanted to keep the look relatively neat.

Last summer, H. really started choosing what to wear for herself and it was (and still is) an adventure in creativity.  Here she is with a tutu and camouflage cap that says "lil' Hunter".  Definitely one of a kind!  Again, all the papers are embellishments are from Echo Park.  The title is a cut from "Once Upon a Princess".  I just love how she mixes styles.  Something to learn there.

Summer Activities Bucket

It's hard to believe it's the middle of May already and summer is just around the corner!  Kids will soon be out of school and lots of summer activity lists have been popping all over the web and Pinterest.  I love the idea of having a list of activities to choose from throughout the summer, so even though my little one isn't even in school yet, I'm jumping on the bandwagon.  I picked out these sweet summery papers from Nikki Sivils' "Exit Here" collection - bright and sunny colors, fun patterns.  The sheet of coordinating die cuts are perfect for little projects like my Summer Bucket List.  My LSS, Scrapdoodles, is the perfect place to get inspired.

If you want to make your own, find a suitable bucket (mine was an empty baby formula container) and recover it with paper and embellishments.  I covered two dowel rods with papers and strung a length of twine across to create the banner.  The dowels are stuck in a piece of floral foam inside the container.  Layer on more embellishments and load it with lots of summer activity ideas.  There is no shortage of ideas on the web and/or Pinterest.  Mine are geared toward my young daughter.  Feel free to use mine and add to it with ideas from your kids!

1.   SUMMER READING CLUB AT THE LIBRARY
2. POOL NOODLE AND BALLOON GAME
3.  BACKYARD PHOTO SCAVENGER HUNT
4. INDOOR SCAVENGER HUNT
5.  ABC SCAVENGER HUNT
6. MAKE FRUIT/JUICE POPSICLES
7.  MAKE ICE CREAM IN A BAGGIE
8.  MAKE YOUR OWN FINGER PAINT AND PAINT
9. MAKE YOUR OWN CHALK PAINT, PAINT OUT ON DRIVEWAY
10.       GIANT BUBBLES
11. DYE PASTA OR RICE and MAKE JEWELRY, PICTURES, ETC.
12.       PAINT ROCKS
13.        MAKE STEPPING STONES (QUICKRETE AND MARBLES OR KIT
14.       MAKE A MOBILE USING OLD UTENSILS
15.        PAINT BY NUMBER
16.       LEAF (OR COINS, ETC) RUBBINGS
17.        FINGERPRINT DRAWINGS (ALA ED EMBERLY)
18.        MAKE PUPPETS AND PUT ON A PUPPET SHOW
19.       MAKE A SUMMER WINDSOCK WITH RIBBON OR CREPE PAPER
20.     CHECK THEATERS FOR FREE SUMMER
21.       GO FISHING
22.     GO CANOEING
23.      BACKYARD CAMPING
24.     SMORES
25.      FAMILY PUZZLES
26.     SPRAY BOTTLE PAINTING OUTSIDE ON WHITE SHEET
27.      PLANT A GARDEN
28.      PULL WEEDS IN GARDEN
29.     MAKE A FORT WITH BLANKETS
30.      HOMEMADE SPRINKLERS (PVC PIPES, BOTTLES, ETC)
31.        MAKE GOOP
32.      MAKE AND/OR FLY KITES
33.      MAKE AND PLAY CARNIVAL STYLE GAMES
34.      PLAY AT A NEW PARK
35.      BARBIE FASHION SHOW, TAKE PICTURES AND MAKE A SCRAPBOOK
36.     BACKYARD ART PARTY, INSPIRED BY PINTEREST
37.      TEA PARTY IN THE GAZEBO
38.      MAKE A FAIRY GARDEN IN PLANT CONTAINERS
39.     TIE DYE SHIRTS
40.     HOPSCOTCH OR 4-SQUARE OUT ON THE DRIVEWAY
41.       SET UP A TREASURE HUNT IN THE BACKYARD
42.     GEO-CACHING
43.      STRAW PAINTING
44.     MAKE PHOTO POPSICLE STICK PUZZLES
45.      BUG COLLECTING
46.     WATCH A MOVIE OUTSIDE
47.      STAR GAZING
48.      LETTERBOXING
49.     READ IN THE GAZEBO OR PLAY FORT OUTSIDE
50.      BIKE RIDING
51.        GO HIKING
52.      LEMONADE STAND
53.      WASH THE CAR
  
Join me for more summer diys at Nap Time for Crafters Link Up Party.

Saturday, May 12, 2012

Wedding Celebration

Hannah and I had a fun trip to visit my sister in SC and help her put on a very nice backyard party to celebrate my niece's wedding.  We made banners, luminaries, signs, a card box, set up a fun photo booth area, crafted two hula-hoop chandeliers to hang, and more.  Fun, fun, fun!  I especially loved how the dessert table turned out, but was pretty happy with everything.  It was wonderful to be able to give my niece Kayla and her husband Corey a beautiful evening to celebrate their beautiful love!


Wednesday, April 11, 2012

Fresh Layouts, Design Team Wednesday

I LOVE PRETTY PAPER!  and PINTEREST!  Yes, it is somewhat of an addiction (for both).  I am so inspired by ideas on Pinterest and I do have to stop myself from buying more paper sometimes, especially while in Scrapdoodles :)  This trip to Scrapdoodles, I was able to pick up some beautiful papers from Teresa Collins.  The first selection is from her "Fabrications" line.  This paper almost feels like fabric and it was fun to play with some distressing on the edges.  The colors - especially the blue and yellow - are so cheery and really pop when paired up with the neutrals.  This first layout is a scraplift from a layout I first saw on Pinterest (original source here). 

This next set of layouts is also made with Teresa Collins papers, her "Spring Fling" line.  The colors and patterns are bright and fun.  Again, I was inspired by layouts first seen on Pinterest.  This chevron pattern tutorial was found here.  It was easy to piece together using small 1x3 inch strips.  I sewed and roughed up the edges a bit to add a little dimension.  It adds just the right pop of color while still keeping these cute photos of H. and daddy at the forefront.
As soon as I saw this pleated circle on this layout (original source) I knew I wanted to try it out, too.  It's actually quite easy to do.  The original looks much more perfect than mine, but I'm good with that :)  It's sewn onto the scallop circle to keep it in place.  Then I just layered all kinds of die cuts (all from Teresa Collins' "Spring Fling"), some lace trim (October Afternoon) and a few gems to complete the look.