Monday, December 1, 2014

Advent Journaling

I'm following along with Shanna Noel and her Advent devotion journaling.  And yes, I'm also doing a December Daily.  They may intersect and overlap and I'm okay with that.  This morning I spent some time reading Isaiah and was refreshed with the thought and promise of hope.  Hope in Jesus.  That not only is he coming at Christmas, but that he is already here - in word and in sacrament.  Yesterday I encouraged and challenged my Sunday School class to slow down this season of waiting by spending time daily in God's word.  I hope and pray that I will be meeting with him daily and sharing some of what I learn and create.

I completed this page in a journal using my Bible and an Advent devotional for inspiration and pens, watercolors, and watercolor pencils.

For more bible journaling inspiration, be sure to check out Shanna Noel's blog HERE.

Wednesday, October 15, 2014

Praise the Lord, O My Soul Canvas


I read Psalm 103 this morning and I just had to craft something with it.  I turned to my Explore and designed this 12x12 canvas in Design Space.  I used spray paint on the canvas - the aqua blue first, applied the vinyl over that and then sprayed white over it all.  The vinyl peeled off quickly and easily to reveal the bright blue lettering.  I did use a sanding sponge to get some of the blue to show through around the edges and that was it.  What a fun project for me - I was singing His praises the whole time.  :)  Praise the Lord, O my soul!

Friday, October 3, 2014

Daughter of the King Inspiration Painted Sign

My Cricut and I had some time together and I was able to create this wonderful sign over the last few days.  I wanted to create something based on scripture to hang in my daughter's room or bathroom about how loved she is and how beautiful God made her.  I designed the word art in Design Space, cut it with my Explore on a sheet of 12x24 vinyl.
The board is a scrap of plywood that I painted several colors.  I applied the letters and then painted white over the whole top, peeling off the vinyl letters to reveal the colors underneath. My daughter thought there should be more "rainbow" showing through, so I got out the sandpaper and went at it. We both love it :)
I sealed it with a layer of Krylon Crystal Clear Acrylic Coating.  We'll find a spot and hang it up this weekend.

Tuesday, September 16, 2014

The Good Stuff

I used Simple Stories for most of these papers and the bingo cards on this layout.  The adorable, big-eyed owls are from Echo Park.  I debated whether or not to scrap these photos, but then I thought that it's these little moments that are unplanned and "un-big" that often bring us the most joy and bond us together as a family.  So here's to celebrating (and documenting) "the good stuff!"

This layout is based on the sketch by Stuck?! Sketches.  They are celebrating some good stuff, too.
You can play along with this sketch (and have a chance at 6 different prizes) until September 29th.

Happy Scrappin'!


Monday, September 15, 2014

Our Family Room Makeover

Tada! We finished our family room makeover.  The last piece to add was the mantel.  Here's a closer view of this gorgeous piece of oak.  Don't you love the saw marks?
If you examine closely, I'm sure you could pick out all kinds of imperfections on this makeover, but we are sure proud of it,  It's hard to believe that we did most everything ourselves and could bring a room from this sad mess:
to this cozy updated gathering place: 
The washed (with tan/white paint + water) brick is such an improvement over the dated red brick.  I think the mantel is so gorgeous!  We had wanted an old beam, but decided to go with an oak beam wrap (budget friendly and much easier to install and handle).  We purchased our beam wrap from Cochran's Lumber in Berryville, VA.  They sawed and put together the white oak so well you really cannot even see the seam on the edges.  We also had them "antique" the wood with the saw marks and other distressing.  As soon as we applied stain, all those character marks and the natural beauty of the wood really stood out.  I love the rich wood against the fresh white.
 The white cabinets, purchased unfinished from Good Wood in Fredericksburg, VA, fit perfectly over the brick and the cupboards provide awesome extra storage.  Media wires are also hidden behind the trim and inside the cupboards. I love how the brick shows through behind the shelving and as soon as we added the trim over the top and wrapped the room in crown, it looked like expensive built-ins.  We pulled the brass insert out of the fireplace and opted for a black screen instead.  It's hard to tell in the photo, but we removed the old nasty carpet and replaced it with light colored hardwood to match the other flooring on our main level.

Here's a few more views of the room and some of the diy projects I made.
My painted striped drop cloth curtains, my family subway art, and my chicken wire photo frame. 
Our gallery wall featuring a set of paintings my husband has had since he was a boy, my monogram canvas, antlers from a deer we harvested, burlap circle frames, my gorgeous canvas family photo.


We are so pleased with how everything came together and can't wait to have friends and family over, decorate for the seasons, and enjoy a weekend without a list of renovation "to-do's".


Thursday, September 11, 2014

Sunshine and Chevrons Painted Sign

Just had to share my new painted sign.  I sing this song to my daughter every night and so it was the perfect sentiment to paint on a sign for her bathroom.  The chevrons were a bit tedious (I used painter's tape to mark them), but I really love the bright yellow background.  I created the word art in Cricut Design Space and cut it out onto tag board to use as a stencil.  I just used acrylic paints, so I'll seal everything with a clear coat of Krylon Acrylic Sealer.  I can't wait to hang it up!

I hope you had a chance to be creative today!

Wednesday, September 10, 2014

Two Page Sketch Challenge


September's Sketch Challenge from DCWV is a two-pager.  Yay!  I love two page spreads and including lots of photos.  Lots of photos on a layout means more story told.  There's still time to play along if you like 2-pagers and are inspired by this fun sketch. Just grab your photos and a stack :) - any stack!

The sketch:

My layout:

For my layout I grabbed The Snapshot Stack.  I snagged this stack on clearance for just $6 a few months ago and hadn't really broke into it, so I decided it was time.  This stack includes lots of little pieces and icons that you can fussy cut and add to your page, like I did.  Our daughter was 4 years old when these photos of her riding her bike were taken, so I was delighted to find a 4 of diamonds card in the stack to incorporate into my page.  For the title, I used a die cut from the Cricut cartridge When I Was a Kid.  I didn't have a 5x7 photo printed, but double matted the focus photo to more closely follow the sketch.  I added a bit of washi tape and used a pen for the border dots.
After taking the photos, I realized I had not yet journaled (gasp)!  Rest assured, I grabbed my black pen and wrote a few lines to tell the story of Hannah's first real bicycle.  I promise ;)


Thanks for checking in - happy scrappin'!

Foxy Card

I recently purchased some fun new products from Teresa Collins and got them out for a quick and cute foxy card.  There is actually a mix of products from TC here, including some papers from Something Wonderful, You are My Happy, and a few new things from Nine & Co.  The wood leaf cut, vellum sentiment, and the cute fox are all part of this new collection.  I haven't used rub-ons in awhile and was really pleased with how easily and smoothly these went on.  Hope you are able to create something happy today! 


Thursday, August 28, 2014

How to Have an OWLsome Year Teacher Gift


I can't believe it, but we are headed over to meet my daughter's Kindergarten teacher this evening.  To distract myself from the thoughts of her going to full time school next week, I've been crafting.  This cute owl is an SVG from Miss Kate's Cuttables that I downloaded as the Freebie of the Day earlier this week.  We are bringing Mr. Owl and the painted canning jar full of pencils to our new teacher.  It's going to be and OWLsome year!

Sunday, August 24, 2014

School Layout


Once again I'm closing in on my "stay current within a year" scrapbooking goal and scrapping our back to school photos from last fall.  This layout highlights some of the back to school photo session pics from our girl a few days before she started 4-year old preschool.  (Pardon me as I wipe my tears at the thought of her going off to Kindergarten this year!!!)  Most of the papers are from a DCWV paper stack.  I incorporated several SRM stickers into this layout.  The large "Hello" sticker drove the title.  I highlighted that with dots and flower borders and a little yellow butterfly. My favorite is the line of "hello sunshine" white lettering laid across the bottom photos.  With her bright yellow dress she really is a little ray of sunshine.

This layout was inspired by this month's SRM Challenge.  I played along with both the color scheme and the theme.  You can check out more inspiring layouts on the SRM Challenge Blog. 

Monday, August 18, 2014

Colorful Beach Layout - DCWV Sketch Challenge

I turned to another sketch challenge to scrap more photos of our beach weekend last summer.  DCWV's  monthly Stack-aholic Template Challenge for August included 3 photos and lots of layers.  This time I used the fun Sunday Afternoon Stack.  I fussy cut many elements from the pages of this stack to create a multi-layered layout. The stack is filled with bright colors and patterns, fun icons and titles, and even some shine!


Sunday, August 17, 2014

Beach Layout

This weekend I was inspired by the current sketch on the Creative Scrappers blog.  They always have wonderful sketches and contributions from their design team and others, but I don't always get a chance to play along. When I needed a sketch this weekend to jump start my scrap time, I got on their blog to see the current sketch.  I liked all the layers in this sketch, so I incorporated that element in my layout especially.  I used a 4x6 photo instead of the square and turned things around a bit.  I reached for my stack of Heidi Swapp papers and embellishments (from her "Dreamy" line) - the water color feel and cool beach-y colors are perfect for the layout. I added some black borders which help ground and highlight some of the layers.  The embellishment pack included these great doodle stars, which I think look a little like starfish.


Monday, August 11, 2014

More Wedding Layouts to Love...

Here's one more batch of photos (I apologize, they are really bad photos taken on a sunny afternoon) of more wedding layouts I completed for my sweet niece and her cute hubby.  You can see more layouts from this custom wedding album HERE and HERE.  Click on a photo to enlarge it.  Enjoy!

Such a gorgeous group of women!


Love these fun and silly "super shots"

I kinda think every good party or event should have a photo booth.

Isn't this end-of-the-day shot gorgeous? The white overlay is from Teresa Collins.


The beautiful photos are all taken by Joe Hang from Joe Hang Photography in Wisconsin.

Tuesday, July 29, 2014

Monogram on Canvas

I just finished this large canvas monogram for our family room.  The canvas is a 12x16.  The striped background is from a Teresa Collins collection and I added the monogram cut from my Cricut Explore (Gypsy Font).  Everything is simply mod-podged on.  I love how it turned out.  We just finished painting our family room walls this rich green color (after gutting the entire room and re-hanging drywall where painted paneling had been).  It's going to look great in our completed room and I can hardly wait!


I linked up with other amazing creative inspiration here: 
Today's Creative Blog

Monday, July 28, 2014

Wedding Layouts to Love - Part 2

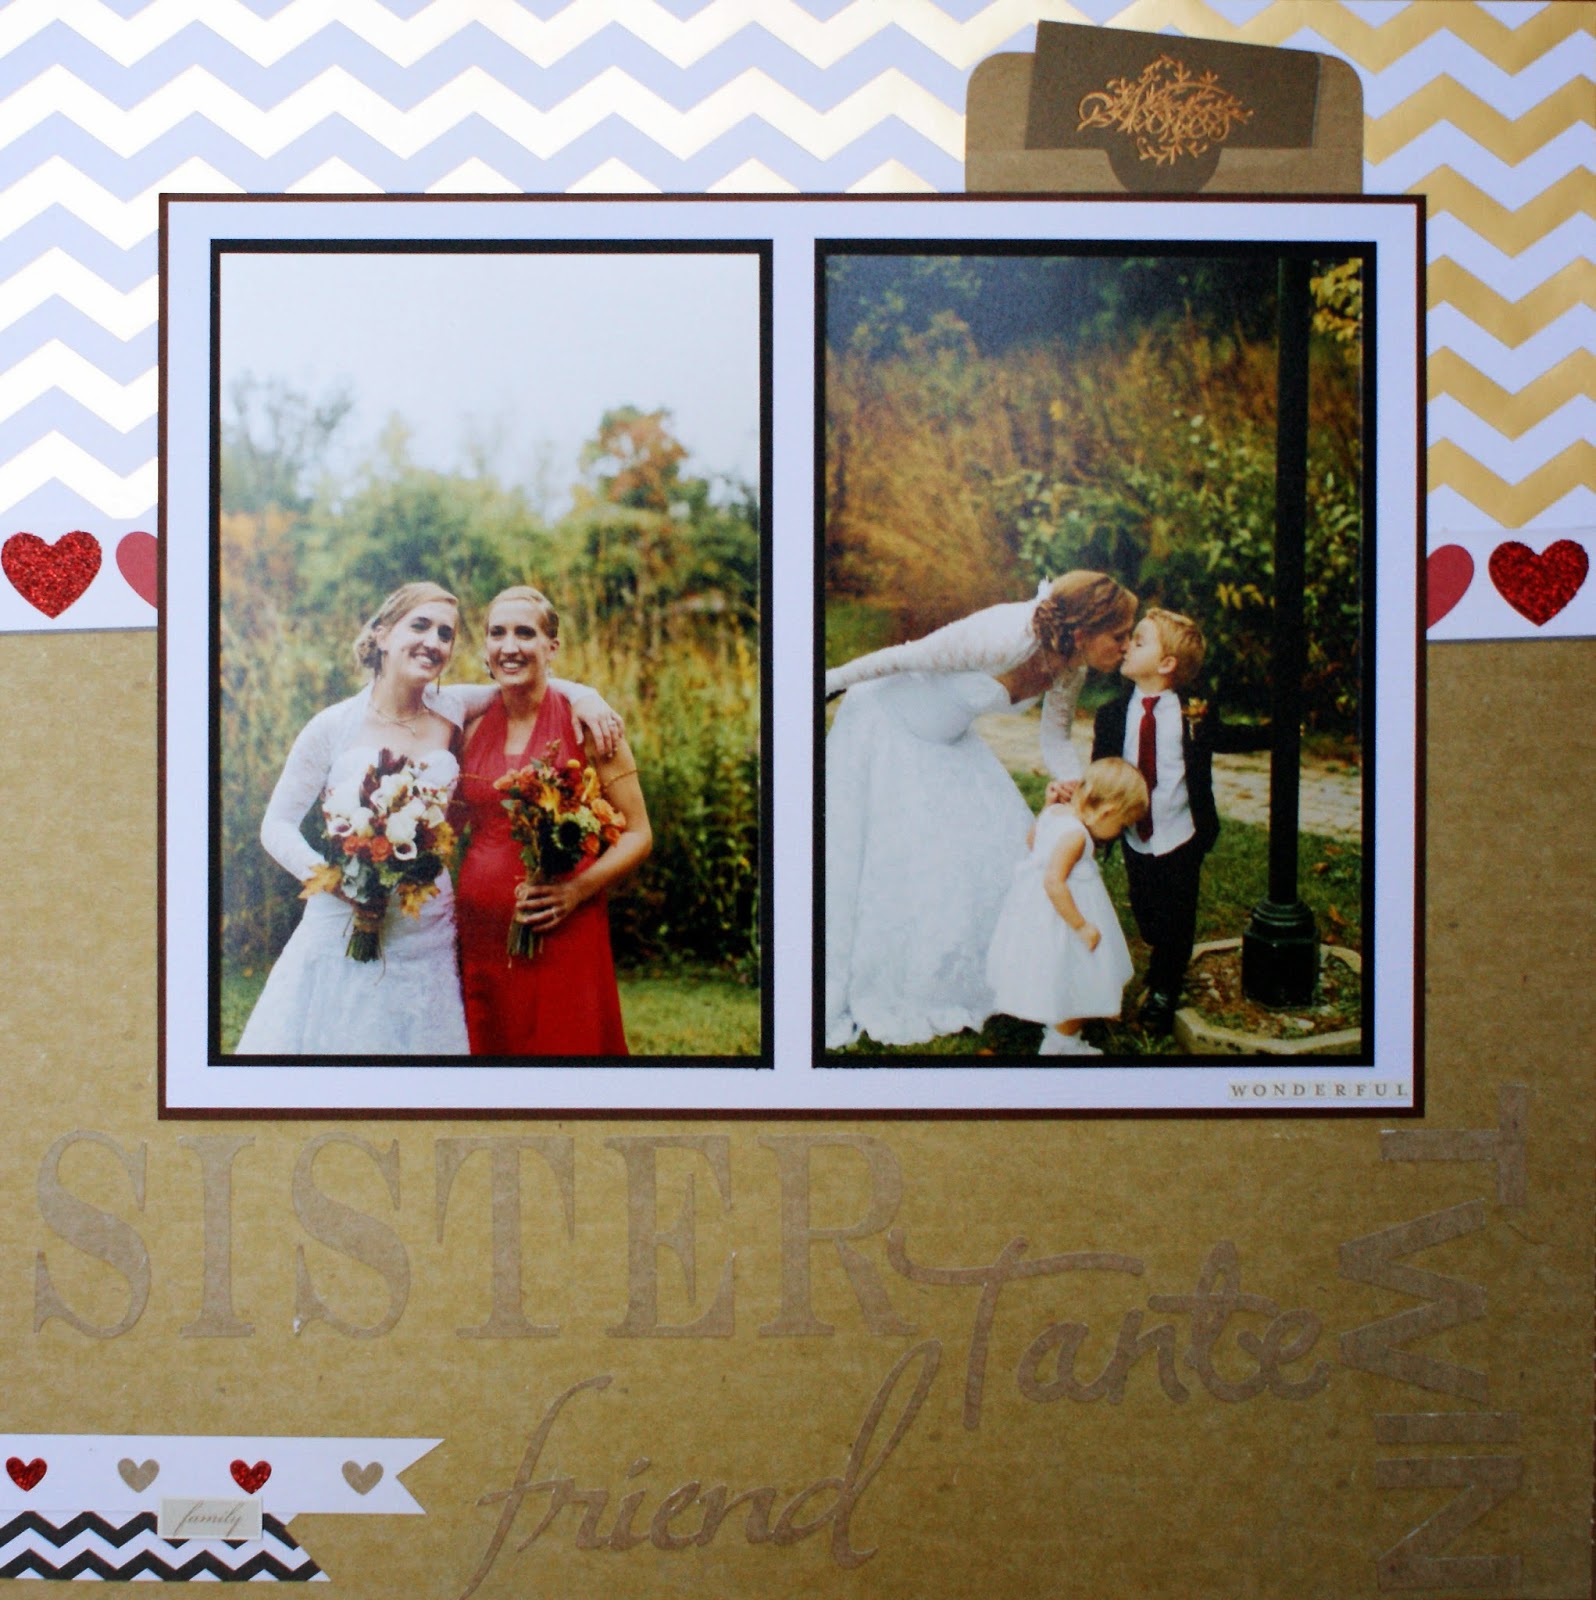
Here are some more layouts from my recently completed my wedding gift to my niece - a custom scrapbook album containing layouts of photos from her wedding.  Completed, it totaled 48 layouts and over 180 photos.  Her photographer, Joe Hang, was amazing and I was privileged to use his fabulous photos for this album.

My photos of the layouts are not so amazing - sorry about that!  I was in a hurry to photograph them (on a very sunny day) before packing it up to take to our vacation in Wisconsin.  My niece and her husband, Jenny and Matt, love their new album, and that makes me super happy. Over the next few weeks I'll be sharing some of these wedding layouts.  Click on a photo to enlarge it.  Enjoy!


The beautiful photos are all taken by Joe Hang from Joe Hang Photography in Wisconsin.

Friday, July 25, 2014

Pinterest Pick - Birthday Card


Pinterest is an inspiring place!  So much to love and admire.  So much time to be lost....  I do feel, in order to justify some of that time spent on Pinterest, I have to be very deliberate about going back to my boards and actually using the ideas and inspiration I've pinned.  So,I'm resolving to use my pins and share them here on my blog in my "Pinterest Pick" series.  Each week I'll share a pin I noticed and the inspiration it gave me.

Original pin on left, my version on right.
For today's "Pinterest Pick" I'm sharing a birthday card.  When I saw the original pin (HERE), I was immediately drawn to the color scheme and the simplicity of the birthday candles, so that's what I kept in my own card.  I went through my scraps to find some greys and yellows that would work.  I also found some metallic gold for the candle flames.  The black polka dot is actually washi tape, as is the pattern on the banner underneath "Happy Birthday."  I used my Cricut to cut the scallop rectangle and the Happy Birthday sentiment.  I think this card is a great general birthday card that would be great for a man or woman and it would be easy to change up the color scheme to suit the recipient.  This one is going out tomorrow.  Thanks for the inspiration, Pinterest!


Thursday, July 24, 2014

Wedding Layouts to Love - Part 1

Background paper: Me and My Big Ideas
I recently completed my wedding gift to my niece - a custom scrapbook album containing layouts of photos from her wedding.  Completed, it totaled 48 layouts and over 180 photos.  Her photographer, Joe Hang, was amazing and I was privileged to use his fabulous photos for this album.

I was able to present the album in person on a family trip to Wisconsin.  Jenny and her husband Matt were so excited to see the album and I was so excited and happy to give it to them.  Jenny only got through a couple of pages when she started crying.

They love it!  And that makes me super happy. Over the next few weeks I'll be sharing some of these wedding layouts.  Click on a photo to enlarge it Enjoy!


gold doilies: Crate Paper; Clear orange overlay: Teresa Collins


Cricut for Title, bird die-cut, and fancy border

Gold dot vellum: We R Memory Keepers

water color effect on edges; 3x4 cards: Project Life

Background dots paper: Echo Park Reflections

Gold Rub-on Border: Jenni Bowlin Studio

Background Paper: We R Memory Keepers (Harvest); Orange Glitter: Teresa Collins; Title cut with Cricut

The beautiful photos are all taken by Joe Hang from Joe Hang Photography in Wisconsin.