Showing posts with label cards. Show all posts

Saturday, May 23, 2020

Note Cards to Share

I created a sweet little set of scripture cards for Visual Faith Ministry. You can download my set (and look for the other lovely sets as well!) free to print at home. The set is available in both black and white as well as full color.
I colored my set with colored pencils.

Print them out onto cardstock and write an encouraging message on the back. Or mount them on colored paper and create a folding card. Whatever you do, I hope they encourage both you and the recipient with the truth of God's Word!

Get your cards here at Visual Faith Ministry.

Monday, March 12, 2018

Foil Cards

I've been having a great time discovering different ways to use the new textile foils from SRM.
Today I'm sharing one of my favorites.
To make these cards, I found free online images and resized them and made sure they would print out dark and black. I printed each image onto card stock using a laser (toner) printer. It is key that the image prints with toner ink (not an inkjet printer).  I then ran my image with foil layed on type through a laminator. The heating of the laminator adhered the foil only to the printed image. 
I'll walk you through it in this process video. But I have to warn you, you may become addicted to this easy and quick foil application technique!

Thanks for watching - I hope you are inspired to using textile foil in your projects!

I used:
Textile Foil | Sticker Stitches | Stickers by the Dozen Birthday | We've Got your Sticker Birthday

Friday, September 15, 2017

Coffee Card

I love the increasing crispness to the mornings, lately. Fall is in the air. This cute coffee card is just the thing to brighten a friend's day. I used my Cricut to cut the coffee cup, a bit of fall washi to decorate the lid, and SRM's "Coffee Plans" stamps for the sentiments and beans. Enjoy!

Need more coffee inspiration? 
There's a whole hop with prizes at the Coffee Lovers Blog!
Check it out HERE!


Friday, September 8, 2017

Simple Birthday Cards Set

Do you still send out birthday cards to friends and family? I'm not always perfect at it, but I do enjoy sending out handmade birthday greetings. Last week I dug into my stash to look for a birthday card and discovered I was out (sorry to all those early August b-days).

When I need to make a lot of cards, I settle on one design that I can duplicate easily. For this set of birthday cards, I used my die-cut machine to cut and assemble several cupcakes. I find it easier to do several images at the same time and make a sort of assembly line process. To fancy up these cupcakes, I even added some glitter at their final stage.

Once all the cupcakes were assembled and dry, the cards were super easy and quick to put together. I used plain white cardstock for the base and two layers of patterned cardstock on the front. Then I added one or more cupcakes and a clear sentiment sticker or two. There are so many to choose from in SRM's collections.


As seen in the first photo, I packaged up a few to share. Five cards plus envelopes easily fit into a flat glassine bag touched simply with a ribbon, "just for you" sentiment, and a green stripe at the bottom.
Better go get some more stamps!

For this project, I used:

Thursday, February 23, 2017

Sweet Spring Mini Cards

Mini cards are so fun to make! They are a great way to use up all those little scraps of paper and bits that you just couldn't bring yourself to throw out. Today I'm sharing a sweet set of mini cards using all kinds of goodies. 
I was going for a fresh spring look, so I started with 3 of the new twine colors from SRM and matched up some stickers and papers and got out my new SRM Faith stamps, too.
Each card measures about 2 1/4 inches by 3 inches. Starting with that cute polka dot paper as the base, I added stamped sentiments or stickers along with a tied bit of twine. On card I added a cute bit of doily. To finish each off, I also doodled an outline with a black pen.
These came together quickly and, I'll warn you, are a bit addicting to make. Tuck one into your kid's (or husband's) lunch, next to the alarm clock, or keep a few in your purse to hand out at a moment's notice to someone who needs a little pick-me-up. You never know when a thoughtful little card can really make a difference in someone's day.
Here is a quick video so you can see the inside of the cards, too. Each has an additional stamp and then I chose to write in a bible verse. I hope you make a few of these cards with your SRM goodies!

For this project I used:

Tuesday, March 25, 2014

Silhouette Cards

I made a quick set of note cards today using a few different silhouette images featuring dogs from A Child's Year.  I love that cartridge!  For paper, I grabbed one of my DCWV stacks.  I recently found "The Snapshot Stack" on clearance, so I grabbed it, some washi tape, clear sentiment and stitching stickers from SRM, and a few other odds and ends (enamel dots, twine, paper clip) to create these cards.


Thursday, September 12, 2013

Vintage Sewing Pattern Paper Cards

I recently visited a friend who "unloaded" a bag full of old sewing patterns. I was happy to accept them and she was happy to get rid of them. I love the idea of mixing in the pattern papers with other items and couldn't wait to find a fun use for them.  I am currently in a "use what I have" mode and luckily remembered some older Cosmo Cricket papers with a sewing theme. (It's called Material Girl in case you're wondering.)   
Sew, (ba-dump-bump) after I returned home with my bag of sewing patterns, I found my papers and got to work making these 3 quick cards.  (How do you like the sewing machine??? This gem was my mom's.)
All the cards started with a kraft cardstock base and I used mainly the Cosmo Cricket collection I dug out.  I had kept the collection together and it included some chipboard stickers and fun borders and other paper elements.  For this first card I also used some Tiny Type letter stickers and a short piece of thread that I wound around the chipboard spool.  I love the piece of sewing paper against that gorgeous green vintage-inspired scrapbook paper.  The tape measure bit is also paper (which I crinkled up and inked). 
 For my next card I created a flower like embellishment with a chipboard button and a small piece of sewing pattern paper. A few more additional paper and chipboard pieces, SRM sticker border stitches and a stamped sentiment finished it off.
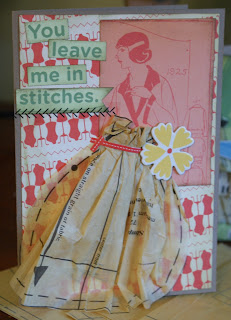
 My last card is a 5x7 size and this time I made a skirt for the patterned paper lady by gathering a larger piece of sewing pattern tissue.  With a little "belt" of sticker border and chipboard flower, she's all ready to go out.  The sentiment is from the CC paper and I added a bit of SRM sticker border stitches. 
I have quite the stash of patterns to play with now, so I'll need to think of some more ways to use it up.  I may make some fun tissue flowers next.  Fun, fun, fun!