I recently purchased some fun new products from Teresa Collins and got them out for a quick and cute foxy card. There is actually a mix of products from TC here, including some papers from Something Wonderful, You are My Happy, and a few new things from Nine & Co. The wood leaf cut, vellum sentiment, and the cute fox are all part of this new collection. I haven't used rub-ons in awhile and was really pleased with how easily and smoothly these went on. Hope you are able to create something happy today!
Showing posts with label Teresa Collins. Show all posts
Wednesday, September 10, 2014
Monday, August 11, 2014
More Wedding Layouts to Love...
Here's one more batch of photos (I apologize, they are really bad photos taken on a sunny afternoon) of more wedding layouts I completed for my sweet niece and her cute hubby. You can see more layouts from this custom wedding album HERE and HERE. Click on a photo to enlarge it. Enjoy!
Such a gorgeous group of women!
Love these fun and silly "super shots"
I kinda think every good party or event should have a photo booth.
Isn't this end-of-the-day shot gorgeous? The white overlay is from Teresa Collins.
The beautiful photos are all taken by Joe Hang from Joe Hang Photography in Wisconsin.
Tuesday, July 29, 2014
Monogram on Canvas

I linked up with other amazing creative inspiration here:
Thursday, May 8, 2014
Teresa Collins and We R Memory Keepers - Albums Made Easy Layouts
Two of my favorite companies recently came together to bring us some very exciting new products. Teresa Collins Designs and We R Memory Keepers partnered to create several beautiful Albums Made Easy card collections. I've been incorporating pocket pages into my regular 12x12 albums for awhile now. As more of a simple scrapper, I appreciate how easy and fast it makes pages come together, but I love the beauty of these card collections and how, if I'm in the mood, I can easily dress them up in any number of ways and still maintain that linear feel that I like. Each pocket can house a photo, a card, journaling, or any combination of elements, the only limit is our imagination. Today I'm sharing a few of my most recently completed pages using the TC designed cards for the Albums Made Easy system.
I couldn't be more delighted with how my daughter's eyes are perfectly peeking through this clear 4x6 card! Of course I had to add a little sparkle on top of the card - how can you spell sparkle without actual sparkle???
The rich colors in the "Quoted" AME collection really lent themselves well to this next layout featuring fall photos of our new puppy, Zoe. I cut apart and layered some of the elements from the cards (cute camera!) to create the top row title which I carried across into the next photo pocket. Here I layered some TC tiny alpha stickers directly on top of my photo and added a heart fussy cut from another of the cards.
In the middle row, I found some coordinating We R cardstock and created a die cut title using the TC Sophisticated fancy framed font. Using Cricut Craft Room, I stretched and resized the letters a bit so that they would use up the entire 3x4 pocket. I love how they look paired with the acetate cards behind them.
On the bottom row, I added a card for journaling, an appropriate quote card, and some more fun pattern to a photo, tying it together with a bit of washi across the bottom.
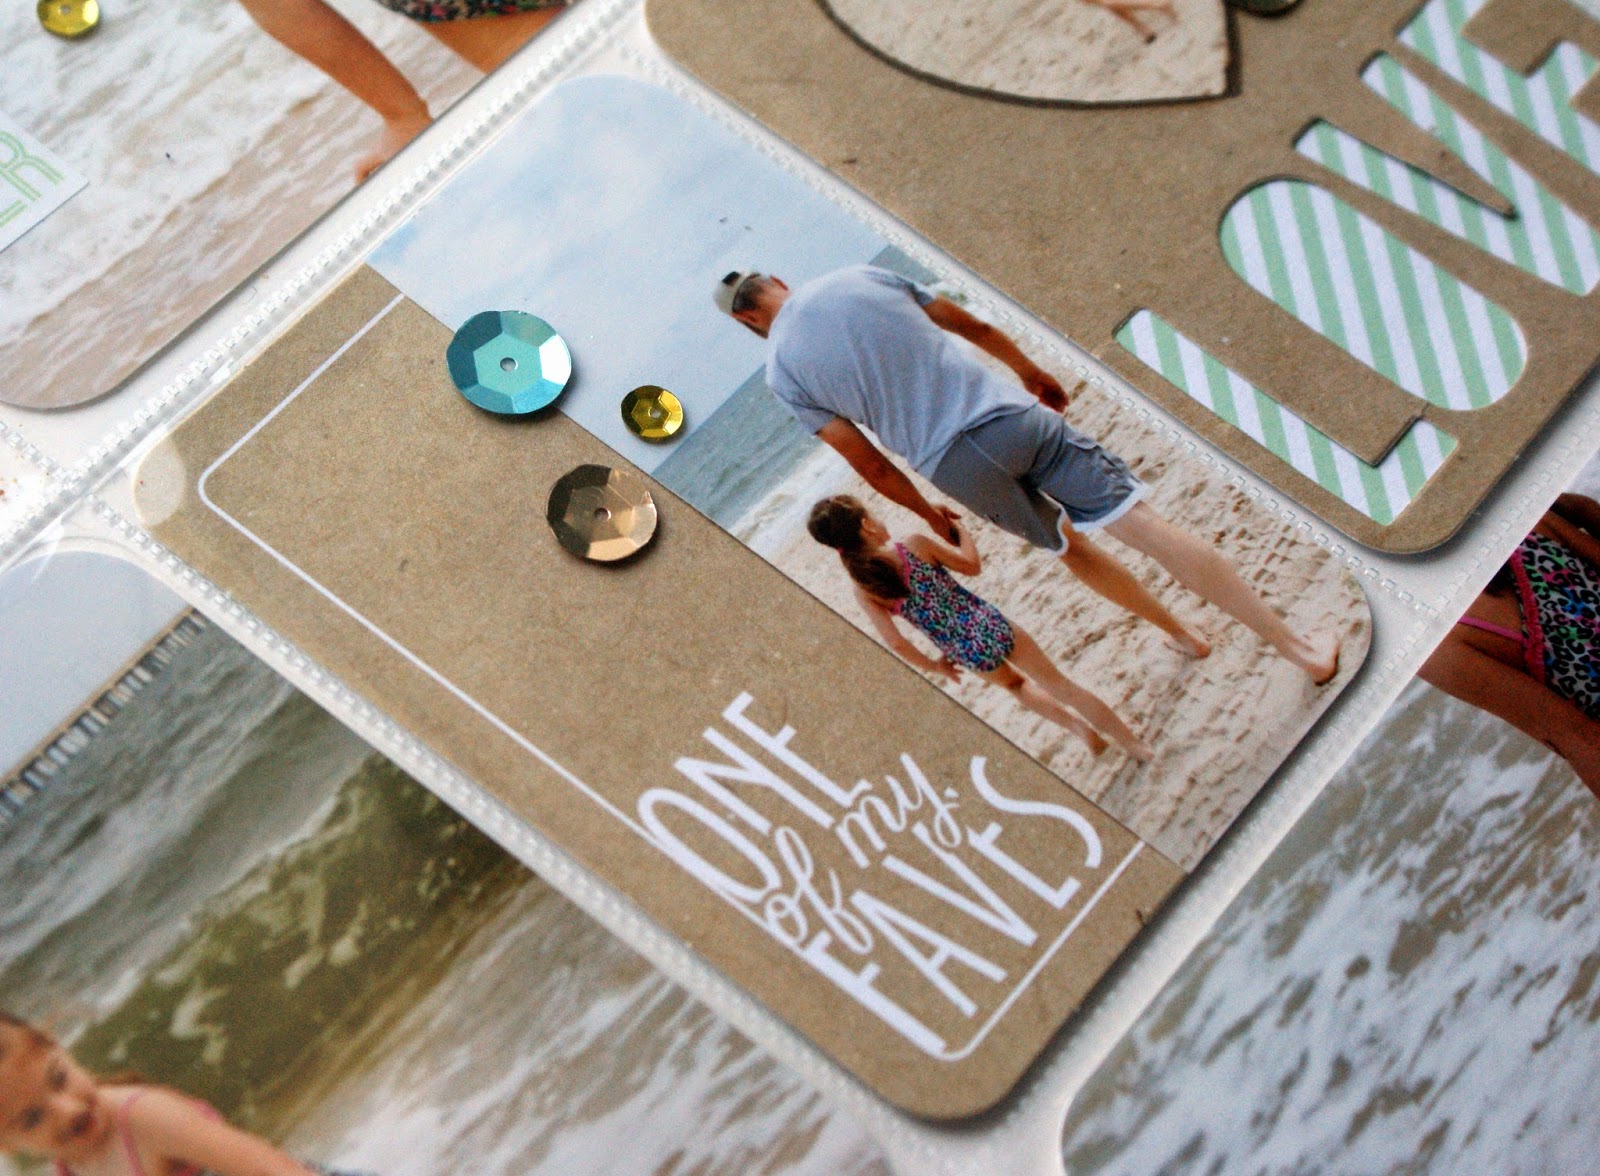
This last layout is another favorite. The cards in the "Snapshots" collection are just perfect with these beach photos from last summer. I'm a big fan of kraft and love the mint green against it. The clear 4x6 card with the subtle white circles was perfect for my title card. I cut out letters from an actual photo (font is TC Sophisticated) as well as added real sand to the bottom. For this layout I used lots of stickers from the coordinating "Snapshots" page kit and lots of sequins.
I was able to use a lot of photos in this layout and paired them with several cards. I really felt like each pocket was a little work of art :) and it makes me happy to relive our fun time at the beach.
Because this layout has several different techniques and elements, I made a video to look at it a little closer and maybe you'll be inspired to try a few new things, too!
Thanks for sticking with me to the end of this post. I hope you find some time to create a layout or two and record your important, everyday love stories! Blessings, Karen
This is one of my favorites. The photos aren't my best - they are from my iphone, but they are precious to us. These are some of the last photos taken of my daughter and her Umpy Lumpy. I really wanted these sweet photos to be the emphasis of the page and also have enough room to journal our thoughts and memories. The "Hello Life" collection perfectly sets the background and quietly complements the photos. I also brought in some We R sheer metallic gold heart paper and basic brown/gold cardstock in the mini hearts (die cut with my Cricut and TC Sophisticated cartridge) - one on each photo and a few others scattered around.
This clear 3x4 card is one of my favorites, too. I chose to use it alone, but the white lettering looks awesome against a darker background or photo.
I utilized two 3x4 boxes for the journaling, uniting them with the sheer heart paper. I trimmed opposite ends of two identical 3x4 cards to elongate them across the sections and give me more space for journaling. The stamps used in this layout are from Teresa Collins as well (Stationary Noted set).
This next layout is a fun and silly one, but it also relays an important message for my daughter - "Never apologize for being who you are." These silly photos and the large quote card and clear "Don't Be Afraid to Sparkle" cards are perfect for this layout. I love, love, love working with products that are not only beautiful, but inspire me to create layouts that are meaningful and help to drive my journaling.
I used elements from the new "Quoted" and "Hello Life" AME collections as well as pulled in papers, stickers, and enamel dots from TC's "Hello My Name Is" paper collection.
The rich colors in the "Quoted" AME collection really lent themselves well to this next layout featuring fall photos of our new puppy, Zoe. I cut apart and layered some of the elements from the cards (cute camera!) to create the top row title which I carried across into the next photo pocket. Here I layered some TC tiny alpha stickers directly on top of my photo and added a heart fussy cut from another of the cards.
In the middle row, I found some coordinating We R cardstock and created a die cut title using the TC Sophisticated fancy framed font. Using Cricut Craft Room, I stretched and resized the letters a bit so that they would use up the entire 3x4 pocket. I love how they look paired with the acetate cards behind them.
On the bottom row, I added a card for journaling, an appropriate quote card, and some more fun pattern to a photo, tying it together with a bit of washi across the bottom.
I was able to use a lot of photos in this layout and paired them with several cards. I really felt like each pocket was a little work of art :) and it makes me happy to relive our fun time at the beach.
Because this layout has several different techniques and elements, I made a video to look at it a little closer and maybe you'll be inspired to try a few new things, too!
Thanks for sticking with me to the end of this post. I hope you find some time to create a layout or two and record your important, everyday love stories! Blessings, Karen
Monday, April 28, 2014
The Meaning in Scrapbooking - Not Just a Hobby
If you are not convinced that scrapbooking is so much more than a hobby, watch this video presentation by Teresa Collins. LOVE, LOVE, LOVE her message about how important, worthwhile, and meaningful it is to take photos, print your photos, put them in an album with some journaling to tell the story, all the while making it pretty, easy, and memorable.
I just got so excited to watch this video because everything she says is how I feel about scrapbooking - record the meaningful moments of life - everything - the good, the bad, & the ugly!!! Thanks to Teresa Collins for sharing this message today!
Wednesday, March 12, 2014
Love This Girl (and these papers) Layout
I so excited to be able to play with more new Teresa Collins collections papers today. Her "Save the Date" collection is awesome for wedding and engagement, but is not limited to that theme at all. The addition of the black to the soft colors make it a great pick for boys or girls and lots of different occasions. These papers also have a thick and wonderful new texture to them. I was drawn immediately to the bold black striped sheet in the collection and had the perfect photo in mind. The soft pale pinks and greens really soften the starkness of the bold stripe and the black and white photo. I think they are perfectly "married" (chuckle chuckle). I took this photo of my daughter this winter, played with it a bit in Photoshop, and was excited to get it into a scrapbook layout. Most of the elements like the tags, stickers, and enamel dots are from the Save The Date collection. I fussy cut the rose bunches from another 12x12 sheet in the collection. While at Scrapdoodles, I also picked up the gold chipboard starts (Studio Calico) and added them to the layout.
Look closely at the photo and you'll notice one of Teresa Collins new photo overlays. I love how this adds yet another element to look at on your layout and this one was perfect over my photo, especially as it repeats the star element.
If you haven't seen it yet, come in to find your own stash of this new collection - it's not just for weddings!
The black and white twine is from my stash - made by Doodlbug Designs. I love the movement in gives to the bottom of the page while still anchoring the overlapping tags.
Look closely at the photo and you'll notice one of Teresa Collins new photo overlays. I love how this adds yet another element to look at on your layout and this one was perfect over my photo, especially as it repeats the star element.
If you haven't seen it yet, come in to find your own stash of this new collection - it's not just for weddings!
Friday, February 28, 2014
Two-Page Layout "This is Me"
I just brought home some new Teresa Collins and it was taunting me on my craft table - "Use me! Use me!" So I did. :) "Hello My Name Is" is a great color palette for any occasion and I really love the sentiments in this collection - it's all about being yourself and living your life fully and in a way that's uniquely you. I think these photos of my daughter dressing up fits the theme perfectly. She really is awesome!!!
I don't post a lot of Two-Page layouts - they are more difficult to photograph, but I do complete a lot of them. Sometimes you just can't fit all those funny/amazing/can't part with photos onto a single page!
Saturday, February 8, 2014
Love These Layouts!
It's February and love is in the air...and on my craft table! Today I want to share two recent layouts that I really love.
First up: "Me & You." Even thought this photo of my husband and me is out of focus, I love the candid nature of it and that we are both smiling and looking happy. Sometimes those imperfect photos make great layouts! This one uses some of the new Fancy Pants "Be Loved" collection. I really was drawn to the water color feel and soft palette. So many little elements are available with this collection, too. I altered my background sheet by drawing a large heart, sewing the outline with pink American Crafts twine, and then adding some paint and pink chalk to the inside. I also added twine in other places - the tags and several cross stitches on the left side. The "me & you" sentiment was cut with my Cricut - Graphically Speaking is an old cartridge, but still one of my faves. The pink glitter border strip is from Teresa Collins.
I picked up some new My Minds Eye yesterday at Scrapdoodles and had a little fun. I also recently added a couple of new cartridges to my collection, so wanted to use them right away, too. The beautiful background sheet is from MME's Now & Then, "Dorothy" collection. The heart doily (LOVE) was cut with my new Edge to Edge Cricut cartridge. The title is also from a new cart - Small Talk Frames and Tags. The rest of the elements are MME. I'm really loving the phrases and mini letters available with this collection.
Thanks for visiting! I hope you have a LOVE-ly day!
Thursday, September 26, 2013
Happy Halloween Wreath

Finish your wreath with a few extra embellishments from the collection, especially the owls!! Fussy cut some of those adorable owls and add them around your wreath with pop dots. Cut the "Happy Halloween" strip and add that on a diagonal. Fasten a ribbon hanger to the back and you've got the cutest wreath in town to hang on your door!
Saturday, August 17, 2013
Wedding Album Layouts
I recently completed a wedding album for my oldest sister and her new husband. I was able to bring it and give it to them in person when I returned to Wisconsin for a visit. I love watching people look through their new albums - it totally gives me the warm fuzzies! It's really something special to be able to use your gifts and bring happiness to others.
Here are a few of my favorite pages from the album. I just love this first page - such a cute photo of the couple and the gold Teresa Collins paper is magical! Throughout the album I used primarily Teresa Collins, Authentique, and DCWV papers and of course my Cricut. Enjoy!
Wednesday, January 16, 2013
Design Team - 3 Layouts, 2 Collections, 1 Fun Rainy Day
This second layout uses a few more selections from the Now & Then collection. I thought the blues went well with these snowy outdoor photos from last year and emphasized the snow by cutting snowflakes into the main sheet with my die cut machine. Layering the darker patterned paper behind the white ledger paper as well as using the die cut snowflakes on top creates lots of interest and dimension to this page. The title was again cut from Teresa Collins Sophisticated Cartridge.
Right now, Scrapdoodles has most of this collection in stock, including a beautiful coordinating button/brad collection and border strips. Go check it out!
Wednesday, December 19, 2012
Christmas Neighbor Gift Ideas and We R Memory Keepers
What a super exciting day when a box of goodies arrived on my doorstep from We R Memory Keepers! They sent me a generous assortment of papers, chipboard, die cuts and even stamps from their lovely Christmas collection, "Yuletide." I put together 3 different neighbor gift ideas to share - a recovered cd case (to gift favorite Christmas tunes), a simple tea or hot chocolate holder, and a sweet paper stocking for a few little goodies.
Clear CD cases are easy to find. You can create a fun mix of holiday tunes (follow all copyright laws, please!) or share photos on a cd as your gift. To decorate my cd case, I used a variety of papers from the 6x6 paper pad and a layered on a few of the coordinating die cut elements. My deer is cut with my Cricut (Theresa Collins Demcember 25th cartridge). I also added one of the chipboard sentiments to the outside of each case.
For my second gift idea, I filled small 3x5 baggies with loose tea and cut a strip of We R paper to 3 1/4 x12 inches and folded it over/around the bag. I secured it all together using one of the fabric covered coordinating brads (these are really lovely!) and some decorative red/white twine. I also hung a die cut that could double as a gift tag. These would be easy to make several of and have on hand for "unexpected" guests and friends, or to give as favors at your holiday party.
For my final project, I cut a stocking pattern with my Cricut (Teresa Collins December 25th cartridge) and coordinating patterns from the Yuletide collection. I cut two stockings, flipping one image, and then sewed up the sides using my sewing machine. I added some trims and a stamp or two (CUTE gingerbread stamp from We R!) before filling it with a few sweet treats. These could be made any size (mine are only about 6-7 inches long) depending on what kinds of treats you want to fill them with. I think they would also be cute at any holiday table setting - maybe an adorable utensil holder for each place.
Thanks again to We R Memory Keepers for inviting me to be a guest designer and sending me such a generous assortment of products from your Yuletide collection! And thanks to all of you for visiting me here on my humble little blog. I hope you've been inspired.
Blessings,
Karen
Tuesday, December 11, 2012
Stashing Through the Snow...Ornament and Card
My niece loves mustaches and I had the joy of drawing her name for our family Christmas gift exchange. I've been seeing these fun ornament ideas on Pinterest, so I knew I wanted to make her a cute mustache one. It was super easy! I started with a plain white porcelain ball (on sale, no less!). I penciled out my mustache and then went over it with a black sharpie. I added the phrase "stashing through the snow". I messed up the first time and used a q-tip dipped in alcohol to wipe it off and start over again. I also stuck it in my oven for about 20 minutes or so at 350 to make it more permanent. As an afterthought (and after it was out of the oven and cooled), I added some fine glitter to the bottom of the mustache.
Wednesday, October 31, 2012
Halloween Treats With Cricut
I was excited to be able to get the new Create a Critter 2 cartridge - I love these little critters all decked out for the holidays! They are the perfect not-so-scary treat toppers for our Halloween dress up party at preschool. I added a bit of glitter glue here and there to dress them up a bit.
I also picked up these cute notebooks at the Target dollar spot and topped them with more Critters. The title phrases are also on this cartridge - can't wait to use them in our scrapbook pages!
Here is a shot of my worktable (before the cellophane wrapping on the notebooks). Also shown are two cards I made with Teresa Collins' new Christmas cartridge. I recieved both in the mail the same day and just couldn't wait to start working with them. I have to say it's been awhile since I've been so excited for new Cricut carts :) and it felt great! I can't wait to have some time to make the Christmas critters for another set of treat bags - they are so cute, too!
Happy Halloween, everyone! Stay safe and get crafting!
Subscribe to:
Posts (Atom)