Sunday, August 12, 2012

50th Anniversary Party Decorations

My friend Cheryl and I were honored to style a 50th Anniversary party for Ed & Ginny - a wonderful, sweet, inspiring, delightful couple at our church.  We wanted the party to be casual, yet elegant, with a vintage feel.  We used lots of burlap, book pages, and touches of cream and gold.  We couldn't have been more thrilled with how it all came together. 
Our wall treatments really transformed this church basement!  We hung floor to ceiling 60-inch wide burlap panels gathered in the middle with wide ribbon and a small bouquet of flowers and grasses.  In between were sheer curtains and in some areas we hung 8x10 photo canvases of the bride and groom's wedding.

Our bride's wedding dress was displayed at the party in a place of honor, framed by burlap panels and some strands of sewn paper hearts. 
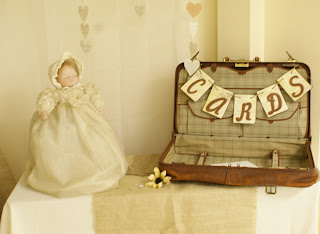
Parts of her dress had been made into a baptismal gown for her children, so we also displayed that.  A vintage leather suitcase dressed up with a simple banner served as our card box.
A guest sign in area featured a banner and the bride's wedding apron, and of course more burlap.

Our tablescape came together with more burlap (a 40 inch square) and lots of beautiful touches. A sweet bouquet in a sand-filled vase sitting on a mirror.  One of our favorite elements are these adorable burlap pockets for the utensils.
Behind the cake table we created these wonderful window photo displays.  A burlap-wrapped wreath with a book page flower hung on the largest window and photos were hung across the windows with jute and tiny clothespins.

Above each table, glittered table numbers hung from either paper lanterns or paper heart "chandeliers" that moved happily in the breeze.  You can't really tell from the photos, but we also covered the harsh flourescent lights with burlap, which diffused the light and created a wonderfully warm atmosphere.
Overall, we couldn't have been happier with the way everything turned out - even better than our vision!  It truly was a joy to plan this party and to do this for a dear couple.  50 years definitely deserves to be celebrated!

Tuesday, July 24, 2012

Orange and Blue - and Some Vellum, Too!

This layout uses two sheets of gorgeous blue and orange paper from Quick Quotes Paper Company and one of their Vellum Journaling Strips.  I wasn't sure about the designs on this "Tin Type" line of papers, but loved the blue/orange color combination, so I took a closer look.  I flipped these two sheets over and found, to my delight, a much more subtle pattern that was easy to use.  I cut a die cut flower pattern out of the orange sheet using the Paper Lace Cricut cartridge and added a journaling box from Simple Stories that I had in my stash (it's cut apart behind the photo to make it appear bigger than its original 5x7 size).  I really liked this vellum title strip, but wanted to make it stand out on the page a bit more.  I love how placing colored and/or patterned paper behind the vellum can change the whole look of it - this makes it easy to match to your layout.  I opted for a small polka dot green print.  Adhering vellum can be challenging, too.  I was out of vellum tape, so I decided to just add a couple of stitches to adhere it to the green paper.  I simply threaded a needle with two colors of thread and doubled it up and stitched a few irregular "stars" to attach the vellum to the green paper.  I then could use my regular adhesive to attach the strip to a piece of chipboard (okay it was just some cardboard) and then used glue dots to attach the whole thing to my page.  Basically, I took a $1.00 vellum strip and with a few items I already had in my stash, turned it into a $3.00 embellishment.  Now that's frugal - and pretty, too!  

I was also drawn to the same color combination on this Nikki Sivils line of papers called "Messages".  It also sported some cute telephone and typewriter graphics and fun little phrases.  I was excited to use the "You are just my type" title for a layout featuring a recent photo of my husband.  I used one sheet as the background and cut a large shape (from Storybook Cricut cartridge) from a sheet of ledger paper (so cool!).  The other two sheets had all sorts of graphics on them, including the strips of typewriters and telephones (just cut them apart and layered 3 strips behind the photo).  I fussy cut the big typewriter and popped it out on the page with foam dots.  The small banner punched out from the die-cut sheet and I threaded a bit of twine through the four pieces to connect them before I adhered it with glue dots onto my page.  I love how this layout turned out.  It was nice to create a page for the man who, after 17 years of marriage, is STILL "my type."

I had lots of elements left, so I also created a few cards.  I used some plain cardstock from my stash and layered various embellishments to create these three cards.  I especially like the "you light up my life" sentiment - too cute!
You can find these fun papers at Scrapdoodles right now.  Challenge yourself with a new color scheme, have a little fun with the vellum strips and send a few "messages" to your friends and family.  I think the Nikki Sivils "Messages" won't last long, so hurry in!

Monday, July 9, 2012

New DCWV Stack and July Stack-a-Holic Challenge

Ahh, I do love me a good stack.  Stack o' paper, that is!  DCWV is always coming out with fun new stacks that I "have" to have.  I found this one on my last trip to JoAnn's - the "A Type of Art" stack.  Fun colors, glossy accents, and really awesome type art.

I needed to catch up a bit on our girl's scrapbook - it just won't do to be a year behind, so I had to finish up July of last year. :) I used the stack, along with the July Stack-a-Holic Challenge sketch on the DCWV blog to create a couple of awesome layouts.
Here's the sketch:
Here's my layout.  I needed two pages, so I just converted the sketch a bit by flipping the second page.  Everything is from the stack.  I cut out the title with my Cricut and decided to use the negative space when I pulled it off the mat.  "Summer" is hand cut from one of the pages and it conveniently sat above the word "fair" on the print below it, so I highlighted it with a simple paper outline, since the animals were at a summer fair.  How convenient! 


I completed a second layout, too.  Used my Cricut to cut out the heart and scalloped circle embellishment.  I like how the "I love you" from another sheet in this stack fit so perfectly in the heart cut-out.  Now that's love!
Now, go find yourself a stack and catch up a little on your scrapbooking!

Tuesday, July 3, 2012

Scrapbooking Your Faith

It's almost time for another round of Scrapbooking Your Faith.  I love this class and am thrilled to be able to offer it again at My Creative Classroom.  Join me on this 4 week journey to explore Faithbooking. Learn how to create layouts that incorporate your faith and family values. Each week you’ll be encouraged to focus on one or more “faith words” and receive journaling prompts, layout ideas, downloadable and printable words and quotes to use, tips, and techniques that will inspire you to create beautiful layouts that ensure your albums not only reflect your life events, but your core beliefs as well.

Class starts July 6th - all online and at your convenience - Scrapbooking Your Faith at My Creative Classroom.  I hope to "see" you in the classroom!

Chore Chart Project

We've been thinking a lot about our girl's growing sense of entitlement.  (Yes, I know she's only 3 1/2, but we are there nonetheless.)  The shocked look on her face and moans and groans that come from her little lungs if one of us tells her "no" is amazing to behold.  We decided it was time to teach her more deliberately that not all in life is free.  Most of the time, you have to work hard for the things you want.  We want her to enjoy hard work and the sense of accomplishment one gets from working hard.  We looked at a lot of ideas for chore charts and rewarding (with money) some of the work that is completed joyfully and to the best of her ability.   

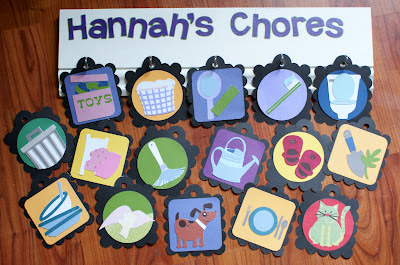
We decided to keep it simple and flexible.  I found a chore chart made with the Cricut Chore Chart cartridge that we really liked.  It is primarily pictures - so our girl would understand it.  It included some "chores" that are habits we want her to develop, such as brushing teeth and cleaning up toys.  It also had some pics of things we need to work on - brushing hair (without screaming) for one.  We like how you can put up 5 chores a day and turn them over to reveal a star when they are completed.  It's then a quick check at the end of the day to see how she did.  We've decided that for each star earned, she will earn one dime.  We'll just drop the dimes into a jar and count them up at the end of the week - probably Saturdays, so we know how much we are giving to church, putting in savings, and putting aside to spend.  She currently has been asking for another Polly Pocket.  I told her she had to do more jobs to earn it. We have a bank for her with "save" "spend" and "share" compartments and the money she earns throughout the week will be appropriately deposited.
Two stars - actually 3 at this posting - earned today - whoo hoo!  Unfortunately, there was WAY too much whining and screaming about the hair brushing.  No dimes for that one and it will stay up to try again tomorrow.  She did clean toilets, though.  What a girl :)

Tuesday, June 19, 2012

Patriotic Picnic and Layout

I must admit I find it hard to limit myself when it comes to all the patriotic papers and embellishments put out every year by paper companies.  I just love the July 4th celebrations with all the picnics, grilling out, hanging out with family and friends, burgers and brats and hotdogs, and of course the fireworks!  It's awesome to be an American!  Right now at Scrapdoodles you can find several awesome lines of patriotic papers and embellishments.  It was hard to choose, but I took home several sheets of double sided papers and some of the layered chipboard elements from We R Memory Keepers "Red, White & Blue" line as well as a few sheets (I couldn't resist the kraft) of papers from Pebbles' "Let Freedom Ring" line.  To complement these papers, I also chose a sheet of tiny letters and phrases made by Authentique ("Glory").  What did I make with all these goodies?  LOTS!  Take a look!

First - a layout with little "Super Hannah" celebrating the hero in her life - her daddy.  I love these papers for a Father's Day layout!   I cut out some of the paper elements to create the two tags at the bottom and part of the title.  The tag and star circles are some of the coordinating layered chipboard.

Next I decided on a few projects to decorate our July 4th picnic table.  These projects were pretty easy to put together and really make your table stand out from the crowd.  I framed the Pledge of Allegiance 12x12 print (by Pebbles) (after adding just a bit of red stickles and a few confetti stars), then added the embellishments to the outside of the frame.  The firecracker element is simply a rolled bit of paper with shiny streamers (left over from some other project) glued into the roll.  For the embellishment in the upper left corner, I started with a 12 inch strip of paper that included the bar strip area to get the striped edge.  It's then just an accordion fold, spread open like a fan and glued onto a half circle on the back.  The tag is a layered chipboard embellishment and the "Let Freedom Ring" flag is, again, part of the barcode of the Pebbles paper wrapped around a toothpick and notched.  Speaking of flags, you can buy them already made by We R Memory Keepers, or go ahead and make your own, like I did, with paper scraps.  I also added some stitching and a few extras to this set of flags.  They are fun to make and a little addicting. You can use them on cupcakes or other desserts or anywhere that needs an extra little "hooray!"


But, wait! There's more!  I made a patriotic centerpiece with the papers by making accordion fold stars and medallions and adding various embellishments.  I added little flags with some of the words from the Authentique sticker sheet.  The "Honor" embellishment is one of the large layered chipboard elements from We R Memory Keepers.  I like how it stands out in my "bouquet."  The tin bucket is something I had bought at the Target dollar spot a few years ago.  I rounded off the centerpiece with some ribbons and paper strips curled around a skewer.  Everything is taped or hot-glued to wooden skewers and stuck into a piece of foam in the bucket.

Last, but certainly not least, I decided to dress up some plain condiment containers with more paper strips, a few tags (cut from the paper sheets) and ribbon.  I love how everything turned out and can't wait to celebrate our country in just a couple weeks.  Happy Birthday, America!
 

Saturday, June 16, 2012

Father's Day

Happy Father's Day to all the awesome dads out there!  While I know my own awesome dad is in heaven, we sure miss him down here.  Luckily, there's another awesome dad in the house - my husband!  I'm so grateful for him, for all he does for us, and for the way he loves our daughter to pieces :).  Hannah and I had a fun time making a few special "powerful" presents for him this year.  She put on her supergirl costume and we had a crazy fun photo shoot in the back yard.  The pics are so cute!  I cut out letters with the Cricut for her to hold to get these shots and printed them out to fit in this 5x7 frame.
I used some of the other photos to create a gift tag with a "powerful" theme.  The sentiments are just printed from my computer.  We paired it with a basket full of power drinks and power snacks.

Next we made a "super" card for our  super daddy.  This time I printed the sentiments right on the photo.  I hope he gets a kick out of these gifts!  I can't get over how fun and easy it was to put these items together.

Of course, even though my own dad is gone, we do still have special men in our lives - my husband's dad, his dear uncle, and friends who are second "dads" to our girl.  So I made a few cards like this one to let them know how much we appreciate them, too.  Happy Father's Day!